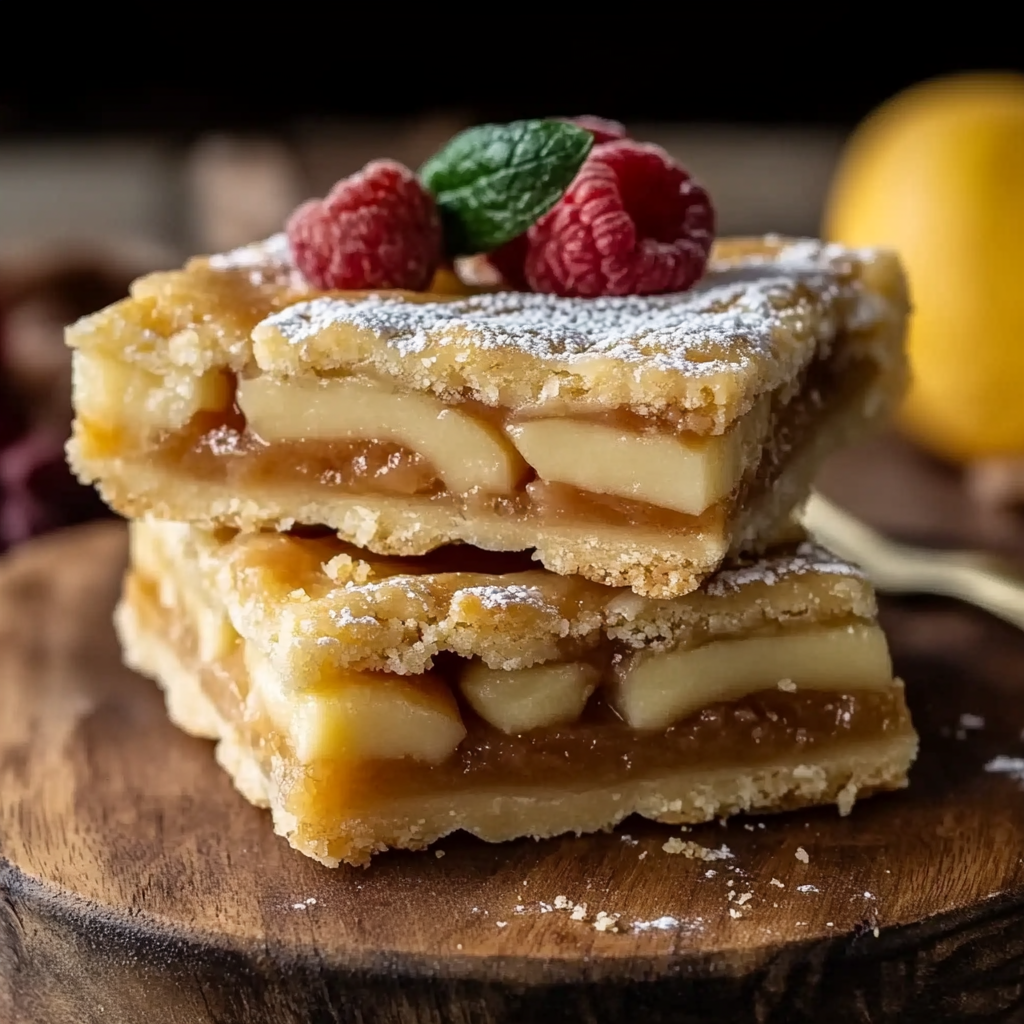
How to Make the Best Apple Pie Bars
The focus keyphrase How to Make the Best Apple Pie Bars perfectly captures the essence of this delightful dessert. These bars combine the classic flavors of apple pie with a convenient, portable format that’s ideal for picnics, parties, or cozy family gatherings. With their buttery crust and spiced apple filling, they are sure to be a hit on any occasion.
Why You’ll Love This Recipe
- Easy to Make: This recipe simplifies the traditional apple pie process into easy-to-follow steps, making it perfect for bakers of all skill levels.
- Delicious Flavor: The combination of sweet apples and warm spices creates a comforting taste that everyone will adore.
- Versatile Treat: Serve these bars as a dessert, snack, or even breakfast option. They pair wonderfully with ice cream or whipped topping.
- Make Ahead: These apple pie bars can be made in advance and stored, making them an excellent choice for meal prep or special events.
- Customizable: Feel free to add your favorite nuts or dried fruits to the apple mixture for added texture and flavor.
Tools and Preparation
Before you start baking, gather your tools to ensure a smooth cooking experience.
Essential Tools and Equipment
- Baking dish
- Mixing bowls
- Measuring cups and spoons
- Whisk
- Knife
Importance of Each Tool
- Baking dish: A good baking dish ensures even cooking and helps achieve that perfect golden crust.
- Mixing bowls: Using various sizes allows you to mix ingredients without spilling, keeping your workspace tidy.
- Measuring cups and spoons: Accurate measurements are crucial for achieving the best flavor balance in your dessert.


Ingredients
For the Crust
- 1 cup all-purpose flour
- 1/2 cup unsalted butter, softened
- 1/4 cup granulated sugar
- 1/4 teaspoon salt
For the Filling
- 3 cups sliced apples (about 3 medium apples)
- 1/4 cup brown sugar
- 1 teaspoon cinnamon
- 1 tablespoon lemon juice
For Topping
- 1/2 cup rolled oats
- 1/4 cup flour
- 1/4 cup brown sugar
How to Make How to Make the Best Apple Pie Bars
Step 1: Preheat the Oven
Preheat your oven to 350°F (175°C). This ensures that your apple pie bars bake evenly.
Step 2: Prepare the Crust
- In a mixing bowl, combine flour, butter, sugar, and salt.
- Use a whisk or fork until it resembles coarse crumbs.
- Press this mixture into the bottom of a greased baking dish evenly.
Step 3: Make the Filling
- In another bowl, mix sliced apples with brown sugar, cinnamon, and lemon juice until well combined.
- Spread this mixture over the crust layer in the baking dish.
Step 4: Prepare the Topping
- In a clean bowl, combine rolled oats, flour, and brown sugar.
- Mix until crumbly and sprinkle evenly over the apple filling.
Step 5: Bake Your Bars
Place in the preheated oven and bake for about 40 minutes or until the topping is golden brown and apples are tender.
Step 6: Cool and Serve
Once done baking, allow your apple pie bars to cool in the pan before slicing into squares. Enjoy!
How to Serve How to Make the Best Apple Pie Bars
Serving Apple Pie Bars can elevate your dessert experience. Here are some delightful ways to enjoy them.
À La Mode
- Serve warm Apple Pie Bars with a scoop of vanilla ice cream on top for a classic combination that melts in your mouth.
With Whipped Topping
- Top your bars with dollops of whipped topping for a light and airy finish that complements the apple flavor.
Drizzled with Caramel Sauce
- Add a drizzle of caramel sauce over your Apple Pie Bars for an extra layer of sweetness and richness.
Fresh Fruit Garnish
- Pair with sliced fresh apples or berries on the side for a refreshing contrast and added color on the plate.
How to Perfect How to Make the Best Apple Pie Bars
Perfecting your Apple Pie Bars can make all the difference in taste and texture. Here are some essential tips.
- Use Fresh Apples: Opt for crisp, tart apples like Granny Smith or Honeycrisp for the best flavor and texture.
- Chill Your Dough: Refrigerate the dough before baking; this helps maintain its structure and ensures a flaky crust.
- Add Spices: Enhance the apple filling with cinnamon, nutmeg, or allspice for deeper flavor notes.
- Don’t Overfill: Be careful not to overfill your bars; too much filling can make them soggy.
- Bake Until Golden: Bake until the edges are golden brown to ensure a perfectly cooked crust.
- Let Them Cool: Allow the bars to cool before cutting; this helps them hold their shape better.
Best Side Dishes for How to Make the Best Apple Pie Bars
Pairing side dishes with your Apple Pie Bars can enhance their flavor. Here are some great options.
- Vanilla Ice Cream
A classic choice, vanilla ice cream complements the warm spices in the pie bars perfectly. - Fresh Berry Salad
A mix of strawberries, blueberries, and raspberries adds freshness and tanginess to balance out the sweetness. - Caramelized Pears
Sweet caramelized pears bring a unique twist that pairs wonderfully with apple flavors. - Cinnamon Sugar Tortilla Chips
These crunchy chips offer a fun texture contrast while echoing similar flavors found in apple pie. - Creamy Yogurt Parfait
Layer yogurt with granola and fruits for a creamy side that provides a nice textural balance. - Nutty Granola
Serve granola as a crunchy topping option for added flavor and nutrition alongside your dessert.
Common Mistakes to Avoid
When making apple pie bars, it’s easy to overlook a few details. Here are some common mistakes and how to avoid them:
- Using the wrong apples: Not all apples are suitable for baking. Choose firm varieties like Granny Smith or Honeycrisp for the best texture and flavor.
- Overmixing the dough: Mixing too much can result in tough bars. Combine ingredients just until they come together for a tender crust.
- Skipping the chill time: Not chilling the dough can lead to spreading while baking. Allow it to rest in the refrigerator for at least 30 minutes before rolling out.
- Not properly measuring ingredients: Use precise measurements for flour and sugar to ensure consistent results. A kitchen scale can be helpful.
- Underbaking or overbaking: Keep an eye on your bars as they bake. They should be golden brown but not too dark, usually around 40 minutes.
Storage & Reheating Instructions
Refrigerator Storage
- Store apple pie bars in an airtight container in the refrigerator.
- They will last about 3-4 days if properly stored.
Freezing How to Make the Best Apple Pie Bars
- Wrap each bar individually in plastic wrap, then place them in a freezer-safe bag or container.
- They can be frozen for up to 3 months.
Reheating How to Make the Best Apple Pie Bars
- Oven: Preheat your oven to 350°F (175°C). Place bars on a baking sheet and heat for about 10-15 minutes until warm.
- Microwave: Heat individual bars on a microwave-safe plate for about 20-30 seconds, checking often to avoid overheating.
- Stovetop: Place bars in a skillet over low heat. Cover with a lid and heat for about 5 minutes, flipping halfway through.
Frequently Asked Questions
Here are some common questions about making apple pie bars:
How to Make the Best Apple Pie Bars gluten-free?
You can substitute regular flour with a gluten-free blend designed for baking. Ensure all other ingredients are also gluten-free.
Can I use other fruits besides apples?
Yes! Pears or peaches work well too. Just adjust sugar levels based on sweetness.
How long do homemade apple pie bars last?
When stored properly, they last up to 4 days in the fridge and up to 3 months in the freezer.
What is the best way to cut apple pie bars?
Use a sharp knife and clean it between cuts for neat slices, ensuring that each piece has an equal amount of filling.
Final Thoughts
These apple pie bars offer a delightful twist on traditional apple pie with their easy-to-handle format. You can customize them with different spices or fruits according to your taste. Give this recipe a try, and enjoy a delicious treat that brings warmth and comfort!
How to Make the Best Apple Pie Bars
Discover the irresistible charm of homemade apple pie bars, a perfect blend of classic apple pie flavors in a portable format. Whether for a picnic, party, or cozy family gathering, these delicious bars are sure to impress. With a buttery crust, spiced apple filling, and crumbly topping, they provide a comforting taste that everyone will love. Easy to prepare and customize with your favorite nuts or dried fruits, these apple pie bars can be made ahead for effortless entertaining. Serve them warm with vanilla ice cream or drizzled with caramel sauce for an extra touch of indulgence.
- Prep Time: 15 minutes
- Cook Time: 40 minutes
- Total Time: 55 minutes
- Yield: Approximately 12 servings 1x
- Category: Dessert
- Method: Baking
- Cuisine: American
Ingredients
- 1 cup all-purpose flour
- 1/2 cup unsalted butter, softened
- 1/4 cup granulated sugar
- 1/4 teaspoon salt
- 3 cups sliced apples (about 3 medium apples)
- 1/4 cup brown sugar
- 1 teaspoon cinnamon
- 1 tablespoon lemon juice
- 1/2 cup rolled oats
- 1/4 cup flour
- 1/4 cup brown sugar
Instructions
- Preheat your oven to 350°F (175°C).
- For the crust, mix flour, softened butter, granulated sugar, and salt in a bowl until crumbly. Press into a greased baking dish.
- In another bowl, combine sliced apples with brown sugar, cinnamon, and lemon juice; spread over the crust.
- For the topping, mix rolled oats, flour, and brown sugar until crumbly; sprinkle over the apple filling.
- Bake for about 40 minutes until golden brown and apples are tender.
- Allow to cool before slicing into squares.
Nutrition
- Serving Size: 1 bar (65g)
- Calories: 180
- Sugar: 10g
- Sodium: 130mg
- Fat: 8g
- Saturated Fat: 5g
- Unsaturated Fat: 2g
- Trans Fat: 0g
- Carbohydrates: 27g
- Fiber: 2g
- Protein: 2g
- Cholesterol: 15mg