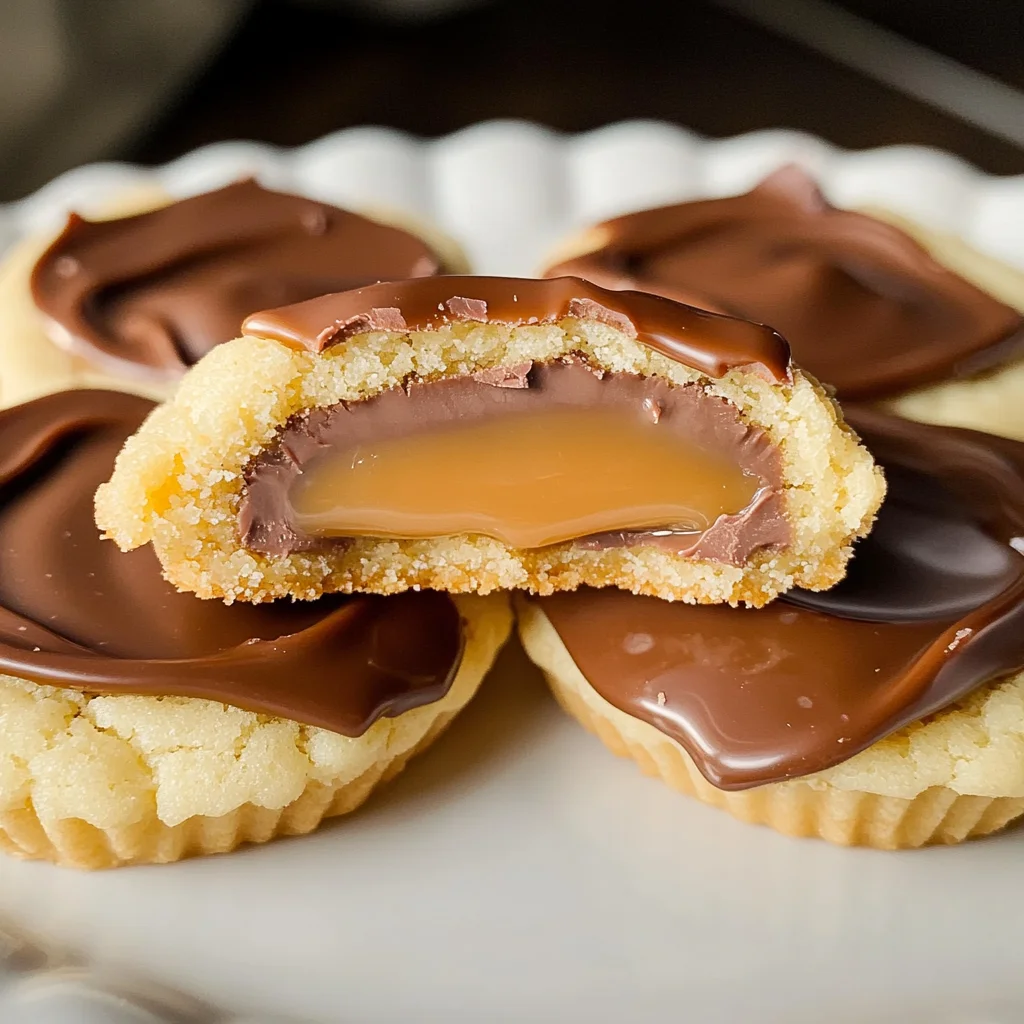
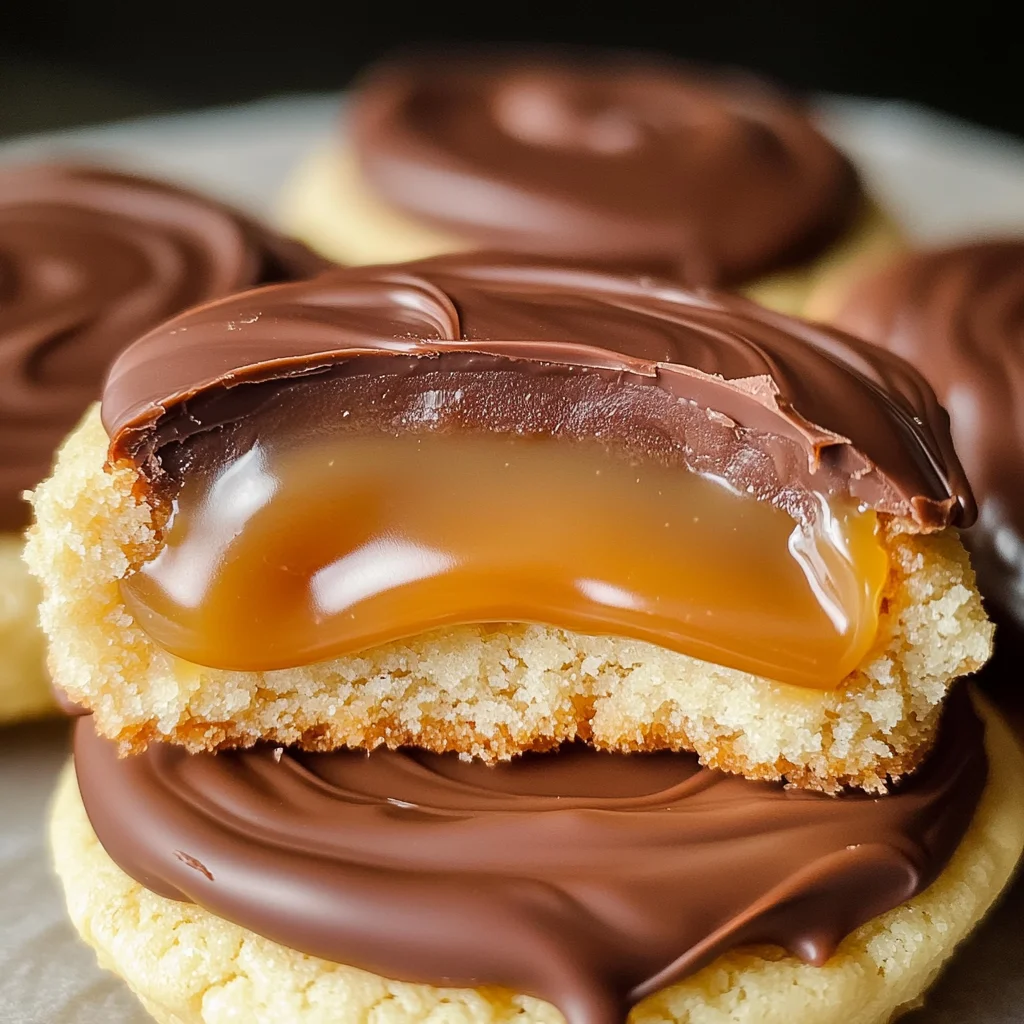
Twix Cookie Cups
Twix Cookie Cups are a delightful twist on the classic candy bar. These delicious treats feature a soft sugar cookie crust topped with creamy caramel and smooth chocolate, making them perfect for any occasion. Whether you’re hosting a party, celebrating a birthday, or simply indulging your sweet tooth, these cookie cups deliver all the flavors you love about Twix in an easy-to-make format.
Why You’ll Love This Recipe
- Easy to Make: With simple ingredients and straightforward steps, baking Twix Cookie Cups is a breeze.
- Delicious Flavor: Enjoy the rich combination of buttery cookies, creamy caramel, and smooth chocolate in every bite.
- Versatile Treat: Perfect for parties, holidays, or just a fun dessert at home; they appeal to both kids and adults.
- Make Ahead Option: You can prepare these cookie cups in advance and store them for later, making entertaining hassle-free.
Tools and Preparation
Before diving into the recipe, gather your essential tools to ensure a smooth baking experience.
Essential Tools and Equipment
- Mixing bowl
- Electric mixer
- Rolling pin
- Round cookie cutter
- Baking pan
- Wire rack
- Microwave-safe bowl
Importance of Each Tool
- Mixing bowl: Essential for combining ingredients efficiently.
- Electric mixer: Saves time and effort when creaming butter and sugar together.
- Rolling pin: Helps create an even thickness for the cookie dough.

Ingredients
For the Cookie Base
- 1/2 cup (111g) salted butter
- 1/2 cup (115g) granulated sugar
- 1 tsp vanilla extract
- 1 egg white
- 1 1/2 cups (228g) all-purpose flour
- 1 tsp baking powder
For the Caramel Topping
- 20 caramels (unwrapped)
- 1 tbsp milk
For the Chocolate Layer
- 2 cups (400g) milk chocolate chips
How to Make Twix Cookie Cups
Step 1: Preheat the Oven
Preheat your oven to 350°F. This step ensures that your cookies bake evenly.
Step 2: Cream Together the Butter and Sugar
In a mixing bowl, combine the salted butter and granulated sugar. Use an electric mixer to cream them together until light and fluffy.
Step 3: Add Egg White and Vanilla Extract
Add in the egg white and vanilla extract. Mix until everything is well combined.
Step 4: Incorporate Flour and Baking Powder
Gradually add the all-purpose flour and baking powder into the mixture. Mix thoroughly until a dough forms.
Step 5: Roll Out the Dough
Roll out the dough on a lightly floured surface to about 1/4 to 1/2 inch thick. Use a round cookie cutter to cut out circles.
Step 6: Bake the Cookies
Transfer the cookie circles to an ungreased baking pan. Bake at 350°F for 6-8 minutes. The cookies should be puffy and no longer glossy when done.
Step 7: Cool Completely
Remove from the oven and transfer cookies to a wire rack. Allow them to cool completely before adding toppings.
Step 8: Prepare Caramel Topping
While cooling, place caramels and milk in a microwave-safe bowl. Microwave for one minute, stirring halfway through until smooth and creamy.
Step 9: Spoon Caramel onto Cookies
Carefully spoon a few teaspoons of caramel onto each cooled cookie. Spread it out until it almost covers each one.
Step 10: Chill Cookies
Place cookies with caramel in the fridge for 10-15 minutes or until completely cold.
Step 11: Melt Chocolate Chips
Melt chocolate chips in intervals of 30 seconds in the microwave until fully melted and smooth.
Step 12: Top with Chocolate
Spread a small amount of melted chocolate over each cookie. Allow them to cool completely before serving.
Enjoy making these delightful Twix Cookie Cups!
How to Serve Twix Cookie Cups
Twix Cookie Cups are a delightful treat that can be enjoyed in many creative ways. Whether for a special occasion or a casual snack, presenting them nicely can elevate the experience.
With Whipped Cream
- Add a dollop of whipped cream on top of each cookie cup for an airy contrast to the rich chocolate and caramel.
Drizzled with Caramel Sauce
- Enhance the caramel flavor by drizzling extra caramel sauce over the chocolate layer for added sweetness and texture.
Paired with Ice Cream
- Serve alongside a scoop of vanilla or chocolate ice cream to create a delightful combination of warm and cold sensations.
Garnished with Sea Salt
- A sprinkle of sea salt on top can balance the sweetness and add an unexpected burst of flavor.
On a Dessert Platter
- Arrange several Twix Cookie Cups on a decorative platter with fresh fruits or berries for an elegant presentation at gatherings.
How to Perfect Twix Cookie Cups
Creating the perfect Twix Cookie Cups requires attention to detail. With these tips, you can achieve cookie cups that are sure to impress.
-
Use Room Temperature Butter: This ensures that the butter creams properly with sugar, resulting in a soft and chewy cookie base.
-
Don’t Overbake: Bake just until the cookies are puffy and no longer glossy. Overbaking can lead to dry cookie cups.
-
Chill Before Serving: Letting the cookie cups chill after adding caramel allows the layers to set perfectly, enhancing their texture.
-
Melt Chocolate Gently: Use low heat or short intervals in the microwave when melting chocolate chips to prevent burning and ensure a smooth consistency.
Best Side Dishes for Twix Cookie Cups
Twix Cookie Cups pair wonderfully with various side dishes that complement their rich flavors. Here’s a selection of options to consider:
-
Fresh Fruit Salad
A vibrant mix of seasonal fruits adds freshness and balances the sweetness of the cookie cups. -
Chocolate Fondue
Serve melted chocolate fondue for dipping slices of fruit or other treats, creating an interactive dessert experience. -
Nutty Granola
A crunchy granola mix brings texture and pairs well with the soft cookie cups, making for a satisfying combination. -
Cheese Platter
Include mild cheeses like brie or camembert for an unconventional pairing that contrasts beautifully with sweet flavors. -
Yogurt Parfait
Layer yogurt with granola and berries for a light side dish that complements the richness of Twix Cookie Cups. -
Coffee or Tea
A warm cup of coffee or herbal tea serves as an excellent beverage choice, enhancing the dessert experience without overpowering it.
Common Mistakes to Avoid
Making Twix Cookie Cups can be straightforward, but small mistakes can lead to big disappointments. Here are some common pitfalls and how to steer clear of them.
- Boldly Measuring Ingredients: Not measuring ingredients accurately can throw off the texture. Use a kitchen scale or proper measuring cups for precision.
- Boldly Overbaking Cookies: Baking cookies for too long can make them hard instead of soft. Keep an eye on them and remove them when they’re just puffy.
- Boldly Skipping Cooling Time: Trying to add caramel before the cookies cool may cause it to melt into a puddle. Allow your cookies to cool completely before adding toppings.
- Boldly Ignoring Chocolate Melting Tips: Melting chocolate too quickly can lead to burning. Use short intervals in the microwave and stir often for a smooth finish.
- Boldly Using the Wrong Type of Caramel: Using firm caramels won’t give the creamy texture needed. Go for soft caramels, which will melt beautifully over the cookies.
Storage & Reheating Instructions
Refrigerator Storage
- Store Twix Cookie Cups in an airtight container.
- They will stay fresh for up to 5 days in the fridge.
Freezing Twix Cookie Cups
- You can freeze these cookie cups for up to 3 months.
- Wrap them individually in plastic wrap and place them in a freezer-safe bag.
Reheating Twix Cookie Cups
- Oven: Preheat your oven to 350°F (175°C). Place cookie cups on a baking sheet for about 5 minutes or until warm.
- Microwave: Heat each cookie cup on high for about 10-15 seconds until warm.
- Stovetop: Place cookie cups in a skillet on low heat, covering with a lid until warmed through.
Frequently Asked Questions
Here are some common questions about making Twix Cookie Cups that might help you out!
What are Twix Cookie Cups?
Twix Cookie Cups are delightful mini versions of the classic candy bar made with a soft cookie crust, creamy caramel topping, and melted chocolate.
Can I customize my Twix Cookie Cups?
Absolutely! You can add nuts, switch up the chocolate type, or even use different flavored caramels for unique twists.
How do I make Twix Cookie Cups vegan?
For a vegan version, substitute butter with plant-based margarine and replace milk with almond or oat milk.
How long do Twix Cookie Cups last?
When stored properly, they can last up to 5 days in the refrigerator and up to 3 months in the freezer.
Final Thoughts
Twix Cookie Cups are not only fun to make but also incredibly delicious! Their versatility allows you to customize flavors and toppings according to your taste. Give this recipe a try; you’ll be amazed at how easy it is to create these delightful treats!
Twix Cookie Cups

Twix Cookie Cups are a delightful treat that brings the iconic flavors of the classic candy bar right to your kitchen. These mini desserts feature a soft sugar cookie base topped with a luscious layer of creamy caramel and rich chocolate, making them perfect for any celebration or just as a sweet indulgence at home. Easy to make and versatile, they are sure to please both kids and adults alike. With their delightful crunch and gooey center, these cookie cups are an irresistible treat that can be customized with various toppings or served alongside your favorite desserts.
- Prep Time: 20 minutes
- Cook Time: 8 minutes
- Total Time: 28 minutes
- Yield: Approximately 12 cookie cups 1x
- Category: Dessert
- Method: Baking
- Cuisine: American
Ingredients
- 1/2 cup salted butter
- 1/2 cup granulated sugar
- 1 egg white
- 1 1/2 cups all-purpose flour
- 20 caramels
- 2 cups milk chocolate chips
- 1 tbsp milk
Instructions
- Preheat your oven to 350°F (175°C).
- In a mixing bowl, cream together salted butter and sugar until light and fluffy.
- Mix in the egg white until well combined.
- Gradually add flour and mix until a dough forms.
- Roll out the dough on a floured surface, cut out circles, and place in an ungreased baking pan.
- Bake for 6-8 minutes until puffy, then cool completely on a wire rack.
- In a microwave-safe bowl, melt caramels with milk until smooth; spoon onto cooled cookies.
- Chill cookies in the fridge for 10-15 minutes.
- Melt chocolate chips in intervals in the microwave; spread over caramel-topped cookies.
Nutrition
- Serving Size: 1 cookie cup (30g)
- Calories: 150
- Sugar: 12g
- Sodium: 60mg
- Fat: 8g
- Saturated Fat: 5g
- Unsaturated Fat: 3g
- Trans Fat: 0g
- Carbohydrates: 18g
- Fiber: <1g
- Protein: 2g
- Cholesterol: 10mg